As an organization officer with full access to manage events, you have the ability to track event participation to keep track of who is attending the events that your organization hosts. The first step in this process is, of course, to create your event! Once your event has been approved, you can manage RSVPs and invitations and finally track the attendance at your event.
To track event participation, switch to the Manage view of Engage using your switchboard, and select your organization. Use the organization tool menu to open the "Events" tab. Click the event you want to manage and then click Track Attendance.
Tracking participation manually
The first method to assign participants to a user is to click the +Add Attendance button. Here, you have three tabs with different options for adding event participation.
Invitations
On the Invitations tab, you will see a list of users that were invited to the event. For each user, select the appropriate level of attendance (Attended, Absent, Excused, or N/A). You can also add additional comments about a user's attendance, if applicable.
Text Entry
On the Text Entry tab, you can enter attendee information in bulk, using either the users' campus email address or their Card ID numbers (either the ID number alone or the full swipe string will work!). So, if you collect users' email addresses during sign-in at an event, you can copy and paste that information into the text entry field and add that attendance data. For each entry, you can also choose the attendance status. Enter up to 500 attendees using this method, with one email or ID per line.
You will only have the ability to upload ID numbers if you have Card IDs configured for your community. Contact your Consultant for more information.
File Upload
The File Upload tab allows you to enter a .csv or .txt file containing attendees' email addresses or ID numbers/string. Select the identifier type, upload the file, assign the proper level of attendance credit, and click Upload. Please limit attendance uploads to a maximum of 1,000 records.
You will only have the ability to upload ID numbers if you have Card IDs configured for your community. Contact your Consultant for more information.
Attendance URL
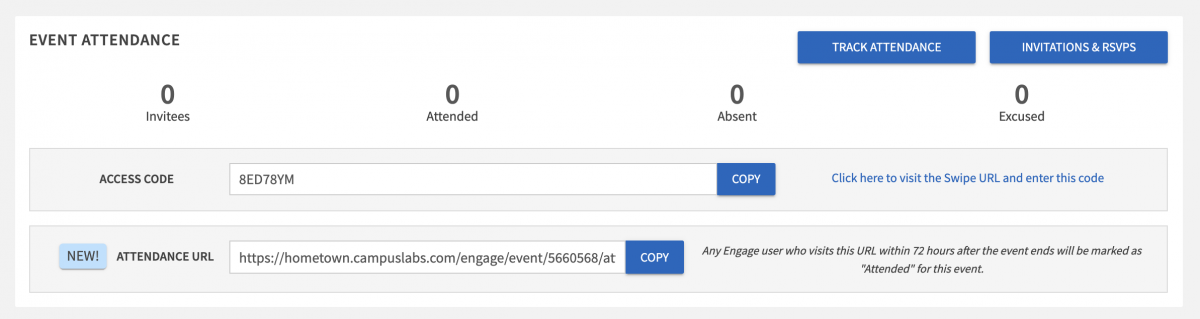
On the Manage Event page for any Event, you will find an Attendance URL. Any Engage user who visits this link during the event or up to 72 hours after the event ends will be marked as attended for this event.
This link can be shared through the chat feature of your online meeting platform of choice, and anyone who clicks on it will essentially be self-reporting their attendance.

Tracking attendance using card swipe
The other method for assigning participation is through the use of card swipe. This is a feature that your campus may or may not use. Please contact your campus directly if you’re curious about using this feature.
If you do have a card swipe and you have a reader or scanner, plug it into your computer via the USB port. You can double-check it's working by opening a text document then scanning your card. If the reader automatically displays the card string on your text document then your card is ready to be used on Engage.
You can copy the Swipe Access Code directly on the Manage Event page without even opening Track Attendance. Then, click the link to go to the swipe page. Enter the access code and click Submit. While the access code can only be reached by an organization officer or administrator, the swipe link and the code can be shared with anyone on campus to assist you with checking people into your event.
You are now ready to begin swiping. The system will process the entry and display either Success or Error. When you are finished, return to the Track Attendance page to view all of the cards that have been swiped.
"Unrecognized Users" in Card-Swiping
If you see an attendance record listed as "Unrecognized User" in the Event Attendance screen, this indicates that the Card ID recorded does not match a Card ID assigned to any Engage User. If you are noticing repeated instances of Unrecognized Users, it may be helpful to evaluate your manual or automatic account import process to ensure all users are being included along with their Card IDs. If a specific user is appearing as "Unrecognized User" when swiped, you can check the User List to make sure that the Card ID has been assigned appropriately. Access your Admin view and then click the Users tab. From there, choose User List and search for the specific user to check if a card ID is listed. Once the correct card ID is entered onto the corresponding user account, that user's event history will be adjusted accordingly.
Tracking attendance on Mobile Phone
Using the Event Check-in App is easy! Similar to card-swiping, an organization officer will need to be able to pull the access code for the event but can share this access code with any member of campus to assist in checking users into the event. In contrast to card swiping, the event check-in app expertly assures user privacy and streamlines the check-in process with no need for student IDs at all.